
ATTENTION:
Did you know that there is an entirely WordPress based CRM built by the same people you’re bout to read about?
You can replace Infusionsoft, FormLift, AppointmentCore and more with 1 FREE plugin (plus never have to google “How to style a web form” again). Go to groundhogg.io to learn more and realize the potential!
How can you style Infusionsoft web forms?
- Grab the HTML code from your Infusionosoft web form.
- Paste the code in the text are of your page.
- Identify the CSS classes.
- Write the CSS code.
- Add the CSS code to your website theme or page.
- Test the form.
Before we get into it,
This article requires you to learn many things, such as CSS and HTML. If you’d like to get the results of a form that looks amazing but requires minimal effort for you to actually create, then click here to check out FormLift, our WordPress plugin that takes care of EVERYTHING for you. Oh, and it’s FREE.
Okay now let’s get started…
Infusionsoft is a wonderfully epic marketing tool that over 30,000 small and medium-sized businesses use to keep track of their customers, automate their marketing, automate their sales pipeline, wow customers with automated fulfillment, handle eCommerce and more.
The majority of Infusionsoft’s core strength comes from being able to capture customer information with an Infusionsoft web form, which even when choosing “advanced styling” look more or less like this.
Pretty ugly… right?
The purpose of a web form can be extremely varied. They can be used to opt in for eBooks, contests, highly detailed customer information, checkups, appointment bookings and so much more.
Infusionsoft web forms, however, have one massive limiting factor. They’re ugly. Really ugly.
The buttons are not mouse over, the text is really small, sometimes the borders don’t even show up around the text fields, the fields can be too small, radio buttons don’t line up etc. It can be a design nightmare to even have it look remotely acceptable to capture customer data. Not to mention the fact that THEY ARE NOT MOBILE RESPONSIVE.
BUT! There is a fix.
Infusionsoft provides you with the “UNSTYLED HTML CODE” which can be used at your discretion to create the most EPIC styled Infusionsoft forms ever.
Here is the step by step procedure to making your own custom styled Infusionsoft forms.
1. Grab the HTML code from your Infusionsoft web form.
After publishing your campaign for the first time, all of the elements of your WEB FORM can be found in the unstyled HTML code area. This area is located to the right of where you would normally copy the JavaScript iframe snippet. Copy that code and you are well on your way.
2. Paste the code in the text area of your page.
If you are using WordPress, paste the code in the TEXT area of your document. THIS IS VERY IMPORTANT! If you post it in the Visual editor it will not work very well at all. Other WordPress themes come with code blocks that you can insert into HTML docs, and those will work just as well. Update your page and have a look, at first you will see a very ugly form, but of course, we’re going to fix that.
3. Identify the CSS classes.
This is the techy bit. Fortunately, Infusionsoft has made it easy for people to write their own CSS code to be used with their forms. Each HTML element has a designated CSS class. MOST Infusionsoft forms will have these classes and HTML associations.
.infusion-field-input-container {
    /* This is where styling goes for input containers */
}
.infusion-submit button[type='submit'],
.infusion-submit input[type='submit'] {
    /* this is where code goes to style button */
}
.infusion-field {
    /* styling for the container that holds input elements */
}
Once you define those classes’ styles, your form will start to look a whole lot better.
4. Write the CSS code.
Learning how to change .css variables is a super long tutorial which cannot be covered in this blog post, however, there are some extremely helpful resources out there to help you learn both HTML and CSS.
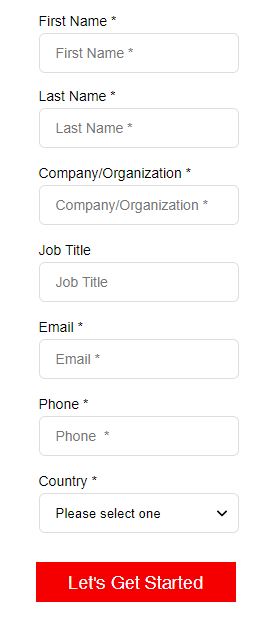
I highly recommend w3schools.com which you can find here. But out of some goodwill and loads of free time, here is some styling that will start you off to create a form that looks like the one here.
.infusion-field-input-container {
    /* This is where styling goes for input containers */
    box-sizing: border-box;
    vertical-align: middle;
    padding: 14px;
    height: auto;
    width: 100%;
    max-width: 100%;
    border: 1px solid #55add4;
    border-radius: 2px;
    background: #55add4;
    color: #ffffff;
    font-family: Raleway, Arial, Helvetica, sans-serif;
    font-size: 16px;
    font-weight: 400;
    float: none;
}
.infusion-submit button[type='submit'],
.infusion-submit input[type='submit'] {
    /* this is where code goes to style button */
    box-sizing: border-box;
    display: inline-block;
    text-align: center;
    vertical-align: middle;
    width: 100%;
    border: 0px solid #ffc107;
    border-radius: 2px;
    padding-top: 13px;
    padding-bottom: 13px;
    background-color: #ffc107;
    color: #FFFFFF;
    font-size: 24px;
    font-family: Raleway, Arial, Helvetica, sans-serif;
    font-weight: 400;
    transition-duration: 0.2s;
    text-decoration: none;
    text-shadow: none;
    text-transform: uppercase;
    cursor: pointer;
    box-shadow: 3px 3px 0px
}
.infusion-field {
    /* styling for the container that holds input elements */
    box-sizing: border-box;
    width: 100%;
    padding: 0px 0px 0px 0px;
    margin: 5px 0px 5px 0px;
    display: inline-block;
}
If you would rather just have all the work done for you, our developers have painstakingly created a plugin called FormLift that will automatically style your form, as well as add on-site validation so that people will never see your UGLY form, an awesome redirect tool, conversion tracking and more!
GET THE PLUGIN HERE!
5. Add the CSS code to your website theme or page.
Once again, if you are using WordPress then this next bit is easy. Most WP themes refer to a stylesheet. This stylesheet is likely called “style.css”. You can find this by navigating to it in your WP dashboard: “Appearance” > “editor” > selecting your theme > the opening “style.css”. Paste your modified .css code at the bottom and save! If you decide to go this route, all Infusionsoft forms you now add to your website will refer to this style.
If you only want the style to appear on a single page, there is a nifty little plugin for WordPress called OH Add Script which allows you to modify the header and footer of your page. Simply wrap the CSS in a style tag and paste it into the header section like so…
<style>
.infusion-field-input-container {
    /* This is where styling goes for input containers */
}
.infusion-submit button[type='submit'],
.infusion-submit input[type='submit'] {
    /* this is where code goes to style button */
}
.infusion-field {
    /* styling for the container that holds input elements */
}
</style>
If you’re not using WP, then you need to locate your theme in CPanel (if you have it) and add the CSS in the style sheet. It will have the same result.
Alternatively if your WP theme has a custom CSS option, just paste the code (minus the
<style></style>
tags) in there to achieve the same results.
6. Test the form to make sure everything is working properly.
Congratulations, you have now styled an Infusionsoft web form. Nicer looking forms are proven to have better opt-in rates than non-styled ones, plus they look way more professional and inviting.
Once again, if you just want to download the free plugin to avoid any learning and get back to creating campaigns, click here now!
There is an update to this post in “How To Style Infusionsoft Web Form Part 2” where I talk about the new “WordPress Plugin” that does all the heavy lifting, enjoy.